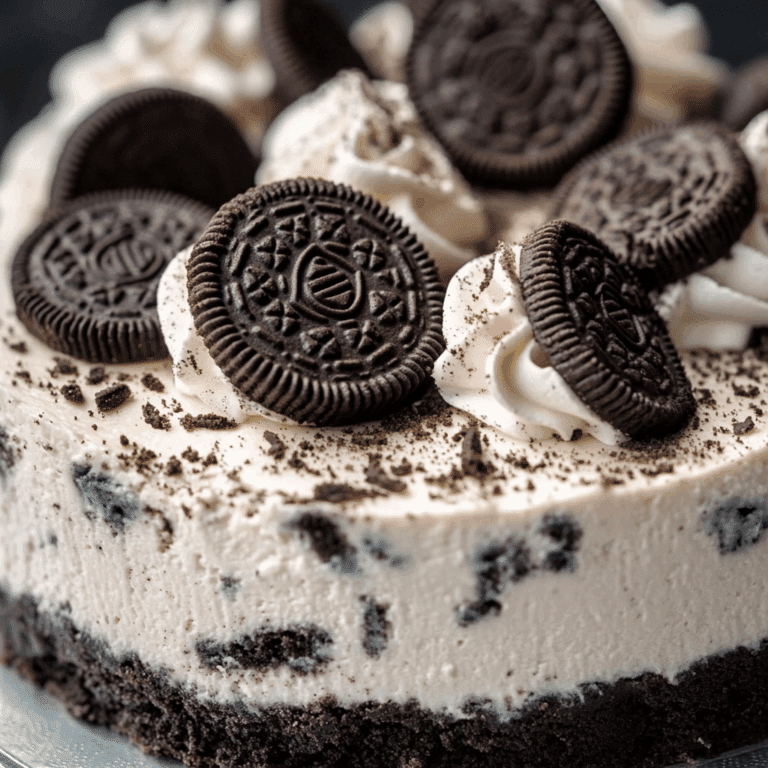
No-Bake Oreo Cheesecake Cups

If you’re craving a quick, irresistible dessert to satisfy your sweet tooth, look no further than these No-Bake Oreo Cheesecake Cups. This recipe perfectly blends creamy cheesecake filling with crunchy Oreo layers, creating a delightful treat that comes together in minutes without firing up the oven. Whether you’re making a last-minute dessert or just want something simple yet scrumptious, these cups are bound to become a new favorite.
Why You’ll Love This Recipe
- Effortless preparation: No baking required means you can whip these up in under 20 minutes.
- Perfect portion size: Individual cups make it super easy to serve and share without any mess.
- Kid-approved: The combination of Oreo cookies and creamy cheesecake is a guaranteed crowd-pleaser for all ages.
- Customizable layers: Add your favorite toppings or mix-ins to personalize your dessert.
- Great for any occasion: From casual gatherings to special celebrations, these cheesecake cups fit right in.
Ingredients You’ll Need
This recipe relies on simple, pantry-friendly ingredients that come together to create a smooth, rich filling contrasted with crunchy Oreo textures. Each component plays an important role in balancing flavor and consistency.
- Oreos: The star of the show, crushed for the crust and chunks for layering, adding perfect chocolate crunch.
- Cream cheese: Provides the creamy base of the cheesecake filling and adds tanginess.
- Whipped cream: Lightens the filling for a fluffy, airy texture that melts in your mouth.
- Sugar: Just enough to sweeten the cheesecake without overpowering the Oreos.
- Butter: Binds the Oreo crumbs for a sturdy crust that holds up nicely.
- Vanilla extract: Adds subtle warmth and depth to the cheesecake mixture.
Variations for No-Bake Oreo Cheesecake Cups
Feel free to get creative and adapt this recipe to match your preferences or dietary needs. These No-Bake Oreo Cheesecake Cups are incredibly versatile and easy to tweak.
- Chocolate lovers’ twist: Add a drizzle of melted chocolate or cocoa powder to the cheesecake filling for extra richness.
- Fruit-infused version: Mix in fresh strawberries or raspberries to add a burst of tangy freshness.
- Nutty crunch: Sprinkle chopped pecans or almonds between layers for a delightful texture contrast.
- Vegan adaptation: Use dairy-free cream cheese and whipped topping to make it plant-based.
- Mint Oreo variation: Substitute classic Oreos with mint-flavored ones for a refreshing minty cheesecake.

How to Make No-Bake Oreo Cheesecake Cups
Step 1: Prepare the Oreo crust
Start by crushing Oreo cookies into fine crumbs using a food processor or placing them in a sealed bag and smashing with a rolling pin. Mix the crumbs with melted butter until combined. Press a spoonful of this mixture at the bottom of each individual serving cup to form the crust layer.
Step 2: Make the cheesecake filling
In a bowl, beat softened cream cheese with sugar and vanilla extract until smooth and creamy. Gently fold in whipped cream until the mixture is light and fluffy, creating the perfect cheesecake filling.
Step 3: Assemble the layers
Begin by spooning some cheesecake filling over the Oreo crust in each cup. Then add a layer of chopped Oreos for extra crunch. Repeat layers if your cups are tall enough, finishing with a layer of filling on top.
Step 4: Chill and set
Place the assembled No-Bake Oreo Cheesecake Cups in the refrigerator for at least 2 hours to chill and firm up. This step ensures the flavors meld together beautifully, and the cheesecake texture sets perfectly.
Pro Tips for Making No-Bake Oreo Cheesecake Cups
- Room temperature cream cheese: Softening it fully ensures a smooth, lump-free filling.
- Don’t overmix whipped cream: Gently fold to maintain a light texture without deflating it.
- Crush Oreos evenly: Mix some fine crumbs with chunks to balance texture in each bite.
- Use small serving cups: Perfect for portion control and makes these cups look extra charming.
- Chill thoroughly: Patience is key; letting them set properly results in the best flavor and texture.
How to Serve No-Bake Oreo Cheesecake Cups
Garnishes
Top your cheesecake cups with extra Oreo crumbs, a dollop of whipped cream, or chocolate shavings for an impressive finish that’s easy to customize.
Side Dishes
Pair these cups with fresh berries or a scoop of vanilla ice cream to complement the rich and creamy flavors for a complete dessert experience.
Creative Ways to Present
Serve these cheesecake cups in clear glasses or mason jars to showcase the layers beautifully, or present them on a dessert platter with cookie sticks and chocolate drizzle for a party-ready vibe.
Make Ahead and Storage
Storing Leftovers
Keep leftover No-Bake Oreo Cheesecake Cups refrigerated in airtight containers for up to 3 days to maintain freshness and texture.
Freezing
You can freeze these cups for up to one month. Just cover them tightly and thaw in the fridge overnight before serving to keep the cheesecake smooth and satisfying.
Reheating
This dessert is best served cold, so avoid reheating. Simply remove from the fridge a few minutes before eating for the best flavor and texture.
FAQs
Can I use gluten-free Oreos for this recipe?
Absolutely! Gluten-free Oreo or similar sandwich cookies work just as well and make the dessert suitable for those avoiding gluten.
How long do No-Bake Oreo Cheesecake Cups last?
Stored in an airtight container in the refrigerator, these cups stay fresh for up to 3 days, making them a convenient make-ahead dessert.
Can I double the recipe?
Definitely! This recipe scales up easily, so just double all ingredients and use larger serving cups or additional containers.
Is it possible to use a different cookie base?
You can swap Oreos for other cookies like graham crackers, chocolate chip cookies, or peanut butter cookies for a unique flavor twist.
Do I need a mixer to make the filling?
A hand mixer makes this step easier and faster, but if you don’t have one, just be sure to beat the cream cheese very well for a smooth result.
Final Thoughts
There’s something truly special about No-Bake Oreo Cheesecake Cups—the combination of creamy, crunchy, and chocolaty that hits the spot every time. Whether you need a last-minute dessert or just want to treat yourself, this quick and easy recipe is dependable, delicious, and endlessly customizable. Give these cheesecake cups a try and watch them become a favorite in your dessert lineup!
Related Posts
PrintNo-Bake Oreo Cheesecake Cups

No-Bake Oreo Cheesecake Cups combine creamy, tangy cheesecake filling with crunchy Oreo cookie layers for a quick, oven-free dessert. Perfect for last-minute treats or parties, these individual cups are easy to make, kid-friendly, customizable, and ready in under 20 minutes plus chilling time.
- Prep Time: 15 minutes
- Cook Time: 0 minutes
- Total Time: 2 hours 15 minutes (including chill time)
- Yield: 6-8 individual cups 1x
- Category: Dessert
- Method: No-Bake
- Cuisine: American
- Diet: Gluten Free (if gluten-free Oreos are used)
Ingredients
Oreo Crust
- 20 Oreo cookies (crushed and chopped)
- 4 tablespoons unsalted butter (melted)
Cheesecake Filling
- 16 oz (450g) cream cheese (softened to room temperature)
- 1/2 cup (100g) granulated sugar
- 1 teaspoon vanilla extract
- 1 cup (240ml) whipped cream (lightly whipped)
Instructions
- Prepare the Oreo crust: Crush Oreo cookies into fine crumbs using a food processor or place them in a sealed bag and smash with a rolling pin. Mix the crumbs with melted butter until fully combined. Press a spoonful of this mixture firmly at the bottom of each individual serving cup to form the crust layer.
- Make the cheesecake filling: In a bowl, beat softened cream cheese with sugar and vanilla extract until smooth and creamy. Gently fold in the whipped cream to create a light, fluffy cheesecake filling without deflating it.
- Assemble the layers: Spoon some cheesecake filling over the Oreo crust in each cup. Add a layer of chopped Oreos for extra crunch. Repeat layers if the cups are tall enough, finishing with a layer of cheesecake filling on top.
- Chill and set: Place the assembled Oreo Cheesecake Cups in the refrigerator for at least 2 hours to chill and firm up, allowing the flavors to meld and the texture to set perfectly.
Notes
- Use room temperature cream cheese for a smooth, lump-free filling.
- Gently fold whipped cream to maintain a light and airy texture.
- Mix fine Oreo crumbs with chunks for a balanced texture.
- Use small serving cups for perfect portion control and a charming presentation.
- Chill thoroughly for the best flavor and texture.
Nutrition
- Serving Size: 1 cup
- Calories: 350 kcal
- Sugar: 25 g
- Sodium: 150 mg
- Fat: 25 g
- Saturated Fat: 15 g
- Unsaturated Fat: 8 g
- Trans Fat: 0 g
- Carbohydrates: 28 g
- Fiber: 1 g
- Protein: 5 g
- Cholesterol: 70 mg
Keywords: no bake, oreo, cheesecake, dessert, quick dessert, easy dessert, individual portions, kid-friendly, gluten free option