Stained Glass Cookies
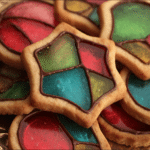
Create vibrant and fun Stained Glass Cookies featuring colorful melted candy centers that shine like jewel-like treats. This easy recipe uses simple pantry ingredients and crushed hard candies to produce festive cookies perfect for holidays, parties, or any celebration. Enjoy the delightful contrast of crisp cookie edges and glossy, chewy candy centers with customizable flavors and colors.
- Prep Time: 20 minutes
- Cook Time: 10-12 minutes
- Total Time: 1 hour 32 minutes
- Yield: 24 cookies 1x
- Category: Appetizers
- Method: Baking
- Diet: Gluten Free
Ingredients
Scale
Cookie Dough
- 2 1/2 cups all-purpose flour (or gluten-free blend for GF version)
- 3/4 cup granulated sugar
- 1 cup (2 sticks) unsalted butter, softened
- 1 large egg
- 1 teaspoon vanilla extract
- 1 teaspoon baking powder
- 1/4 teaspoon salt
Stained Glass Centers
- Assorted hard candies (e.g., Jolly Ranchers or Life Savers), unwrapped and crushed
Instructions
- Prepare the Dough: Cream the softened butter and sugar together in a large bowl until light and fluffy. Beat in the egg and vanilla extract until fully combined. In a separate bowl, whisk together the flour, baking powder, and salt. Gradually add the dry ingredients to the wet mixture, mixing until a smooth dough forms. Wrap the dough in plastic wrap and chill for at least 1 hour to make rolling easier and prevent spreading during baking.
- Crush the Hard Candies: While the dough chills, unwrap your chosen hard candies and place them inside a resealable plastic bag. Use a rolling pin or meat mallet to crush the candies into small pieces—not too fine, to retain the stained glass effect. Set aside the crushed candy pieces.
- Roll and Cut the Cookies: Preheat your oven to 350°F (175°C). Lightly flour a work surface and roll out the chilled dough to about 1/4 inch thickness. Use a large cookie cutter to cut out your cookie shapes. Then, use a smaller cookie cutter or sharp knife to cut out a shape inside each cookie, leaving a frame to hold the candy.
- Fill with Crushed Candy: Line a baking sheet with parchment paper. Place the cookie frames on the sheet and fill each center cutout evenly with crushed candy. Avoid overfilling to allow the candy to melt and settle smoothly during baking.
- Bake to Perfection: Bake the cookies for 10-12 minutes or until the edges turn lightly golden and the candy centers melt into glossy, translucent patches. Let cool completely on the baking sheet so the candy hardens properly before removing.
Notes
- Use clear or brightly colored hard candies like Jolly Ranchers or Life Savers for the best stained glass effect.
- Roll dough to approximately 1/4 inch thickness to keep sturdy edges and prevent breakage.
- Chill dough before rolling to help cookies keep their shape while baking.
- Do not overfill the cutouts with candy to avoid overflow and sticky messes.
- Allow cookies to cool fully on the baking sheet to prevent candy centers from cracking.
- Substitute the egg with flaxseed or chia seed gel for an egg-free version.
- Store cookies in an airtight container at room temperature with wax paper between layers to keep them fresh up to one week.
- Freeze unbaked dough wrapped tightly for up to 3 months; thaw overnight before use. Baked cookies freeze well too.
- Reheat gently in an oven at 300°F (150°C) for 5 minutes; avoid microwaving.
Nutrition
- Serving Size: 1 cookie
- Calories: 150
- Sugar: 12g
- Sodium: 60mg
- Fat: 7g
- Saturated Fat: 4g
- Unsaturated Fat: 2g
- Trans Fat: 0g
- Carbohydrates: 20g
- Fiber: 0.5g
- Protein: 2g
- Cholesterol: 25mg
Keywords: Stained Glass Cookies, Holiday Cookies, Festive Cookies, Colored Candy Cookies, Gluten-Free Cookies, Kid-Friendly Baking, Easy Cookie Recipe
Find it online: https://mealsbysarah.com/stained-glass-cookies/
