How to Make Perfect Pineapple Bliss Bars
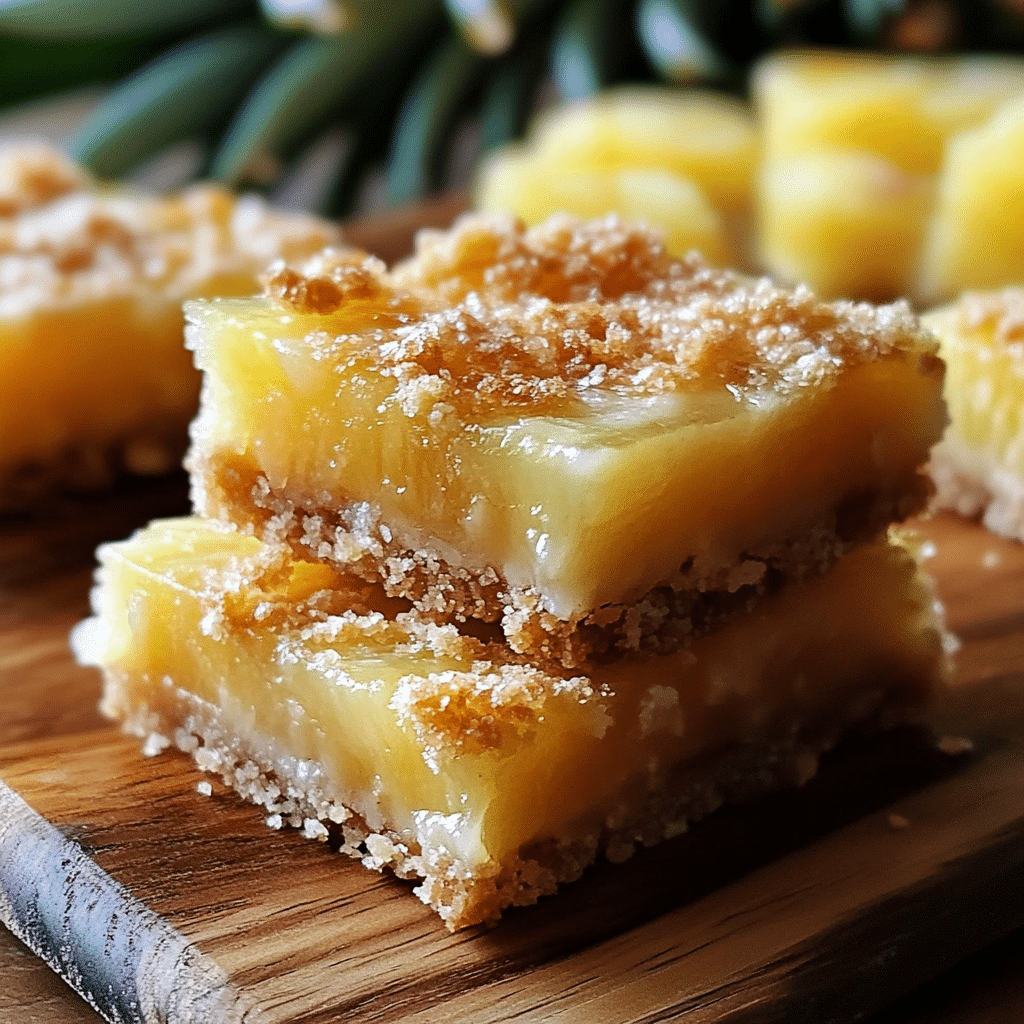
If you’ve ever craved a dessert that strikes the perfect harmony between sweet and tangy, look no further than Pineapple Bliss Bars. These delightful treats combine a luscious pineapple layer with a buttery crust, creating a mouthwatering experience that’s both refreshing and satisfying. Whether you’re serving them at a family gathering or simply treating yourself, Pineapple Bliss Bars offer an easy, delicious way to brighten up any occasion with a tropical twist.
Why You’ll Love This Recipe
- Perfect balance of flavors: The natural sweetness of pineapple blends seamlessly with a buttery base to create an unforgettable taste.
- Simple to prepare: Requires basic pantry ingredients and minimal effort for a rewarding homemade dessert.
- Versatile snack or dessert: Serve it as a casual treat or dress it up for special occasions with elegant presentation.
- Great for all ages: Loved by kids and adults alike, these bars make an ideal family-friendly sweet bite.
- Easy to customize: Adapt the recipe with add-ins or toppings to fit your personal preferences and dietary needs.
Ingredients You’ll Need
This Pineapple Bliss Bars recipe calls for straightforward but essential ingredients, each chosen to contribute uniquely to the final dish’s texture, color, and flavor profile.
- All-purpose flour: Provides the sturdy base needed for the buttery crust that holds everything together.
- Unsalted butter: Adds richness and a melt-in-your-mouth softness to the crust.
- Granulated sugar: Sweetens the crust and pineapple layer just enough without overpowering.
- Crushed pineapple (drained): The star ingredient bringing juicy tartness and tropical flair to the bars.
- Egg: Helps bind the layers and add moisture for a tender texture.
- Vanilla extract: Enhances the natural sweetness and adds a warm, aromatic note.
- Baking powder: Lightens the crust for a pleasantly tender bite.
- A pinch of salt: Balances sweetness and intensifies flavor nuances.
Variations for Pineapple Bliss Bars
Feel free to make these Pineapple Bliss Bars uniquely yours by experimenting with different flavor twists, dietary adaptations, or texture enhancements that suit your taste and lifestyle.
- Gluten-free option: Swap all-purpose flour with a gluten-free blend for a safe and equally delicious version.
- Cheesecake twist: Add a layer of cream cheese between the crust and pineapple for a creamy surprise.
- Coconut flair: Mix shredded coconut into the crust or sprinkle on top for added tropical flavor and texture.
- Nutty crunch: Incorporate chopped macadamia nuts or pecans into the crust for a satisfying crunch.
- Lower sugar: Use a natural sweetener like honey or maple syrup, adjusting quantity to taste while retaining sweetness.

How to Make Pineapple Bliss Bars
Step 1: Prepare the Crust
Begin by preheating your oven to 350°F (175°C). In a mixing bowl, combine the all-purpose flour, baking powder, sugar, and a pinch of salt. Cut the cold unsalted butter into small cubes and work it into the dry ingredients using your fingertips or a pastry cutter until the mixture resembles coarse crumbs. Press two-thirds of this mixture firmly into the bottom of a greased or parchment-lined baking dish to form an even base.
Step 2: Add the Pineapple Layer
Drain the crushed pineapple thoroughly to avoid a soggy crust. Mix the pineapple with one beaten egg and vanilla extract until well combined. Pour this pineapple mixture evenly over the pressed crust, spreading gently to cover the surface without disturbing the base.
Step 3: Top with Remaining Crust
Crumble the remaining third of the crust mixture over the pineapple layer, spreading it out evenly but loosely, allowing some gaps so steam can escape and the pineapple can bubble through.
Step 4: Bake to Golden Perfection
Place the baking dish in your preheated oven and bake for 30 to 35 minutes or until the top turns a lovely golden brown and the pineapple filling is bubbly. Once done, remove from the oven and let cool completely before cutting into bars to ensure clean slices.
Pro Tips for Making Pineapple Bliss Bars
- Drain well: Ensuring the pineapple is well-drained prevents a soggy crust and keeps bars firm.
- Chill the butter: Using cold butter helps create a flaky, crumbly crust texture.
- Don’t overmix: Handle the dough gently when combining ingredients to avoid tough bars.
- Use parchment paper: Lining your baking dish simplifies removal and cuts cleanup time.
- Let them rest: Allow bars to cool completely before slicing to retain their structure and prevent crumbling.
How to Serve Pineapple Bliss Bars
Garnishes
Add a fresh and vibrant touch by garnishing your Pineapple Bliss Bars with a light dusting of powdered sugar, a sprinkle of toasted coconut flakes, or a dollop of whipped cream to complement the tangy pineapple.
Side Dishes
Serve these bars alongside a scoop of vanilla ice cream or a refreshing fruit salad for a balanced and indulgent treat that’s perfect any time of day.
Creative Ways to Present
Arrange the bars on a decorative platter with tropical leaves or edible flowers, or stack them with layers of fresh pineapple slices for an eye-catching dessert display that invites compliments.
Make Ahead and Storage
Storing Leftovers
Keep any leftover Pineapple Bliss Bars in an airtight container at room temperature for up to 2 days, or refrigerate them for up to a week while preserving freshness and texture.
Freezing
Wrap individual bars tightly in plastic wrap and place them in a freezer-safe container or bag. Freeze for up to 3 months for an easy, ready-to-go dessert when cravings strike.
Reheating
To enjoy frozen bars, thaw them overnight in the refrigerator and warm briefly in a microwave or oven to revive that freshly baked softness and flavor.
FAQs
Can I use fresh pineapple instead of canned?
Absolutely! Fresh pineapple works wonderfully as long as it is finely chopped and well-drained to prevent excess moisture from making the bars soggy.
Are Pineapple Bliss Bars suitable for kids?
Yes, these bars are a kid-friendly treat thanks to their naturally sweet but balanced flavor and soft, chewy texture that little ones enjoy.
Can I make this recipe vegan-friendly?
Yes, substitute the butter with a plant-based alternative and replace the egg with flaxseed or chia egg to create a vegan version without sacrificing taste.
How long do Pineapple Bliss Bars last?
When stored properly in an airtight container, they stay fresh at room temperature for 2 days and up to a week in the fridge.
Can I add other fruits to this recipe?
Definitely! Pineapple Bliss Bars work great with additions like mango, shredded coconut, or even blueberries to tailor the flavor to your liking.
Final Thoughts
Pineapple Bliss Bars are truly a treasure in the world of desserts — simple to whip up, packed with tropical goodness, and endlessly adaptable. I encourage you to try this recipe soon and savor the way each bite brings a burst of sunny, sweet, and tangy delight to your taste buds. Your next favorite homemade treat awaits!
PrintPineapple Bliss Bars
Pineapple Bliss Bars are a delightful dessert combining a buttery crust with a luscious, tangy pineapple layer. Easy to prepare with simple pantry ingredients, these bars offer a perfect balance of sweet and tropical flavors, ideal for family gatherings or a refreshing treat anytime.
- Prep Time: 15 minutes
- Cook Time: 30-35 minutes
- Total Time: 45-50 minutes
- Yield: 12 bars 1x
- Category: Dessert
- Method: Baking
- Cuisine: American
- Diet: Gluten Free (if using gluten-free flour blend)
Ingredients
Crust Ingredients
- 1 ½ cups all-purpose flour (or gluten-free blend for gluten-free option)
- ½ cup unsalted butter (cold and cubed)
- ½ cup granulated sugar
- 1 teaspoon baking powder
- A pinch of salt
Pineapple Layer
- 1 can (about 20 oz) crushed pineapple, well-drained
- 1 large egg, beaten
- 1 teaspoon vanilla extract
Instructions
- Prepare the Crust: Preheat your oven to 350°F (175°C). In a mixing bowl, combine all-purpose flour, baking powder, sugar, and a pinch of salt. Cut the cold unsalted butter into small cubes and work it into the dry ingredients using your fingertips or a pastry cutter until the mixture resembles coarse crumbs. Press two-thirds of this mixture firmly into the bottom of a greased or parchment-lined baking dish to form an even base.
- Add the Pineapple Layer: Drain the crushed pineapple thoroughly to avoid a soggy crust. Mix the pineapple with one beaten egg and vanilla extract until well combined. Pour this pineapple mixture evenly over the pressed crust, spreading gently to cover the surface without disturbing the base.
- Top with Remaining Crust: Crumble the remaining third of the crust mixture over the pineapple layer, spreading it out evenly but loosely, allowing some gaps so steam can escape and the pineapple can bubble through.
- Bake to Golden Perfection: Place the baking dish in your preheated oven and bake for 30 to 35 minutes or until the top turns a lovely golden brown and the pineapple filling is bubbly. Once done, remove from the oven and let cool completely before cutting into bars to ensure clean slices.
Notes
- Drain pineapple well to prevent soggy crust.
- Use cold butter to achieve a flaky, crumbly crust texture.
- Handle dough gently; don’t overmix to avoid tough bars.
- Line baking dish with parchment paper for easy removal and cleanup.
- Let bars cool completely before slicing to retain their structure.
Nutrition
- Serving Size: 1 bar
- Calories: 180
- Sugar: 14g
- Sodium: 80mg
- Fat: 9g
- Saturated Fat: 5g
- Unsaturated Fat: 3g
- Trans Fat: 0g
- Carbohydrates: 22g
- Fiber: 1g
- Protein: 2g
- Cholesterol: 35mg
Keywords: pineapple bars, tropical dessert, easy dessert bars, pineapple bliss bars, buttery crust, family-friendly dessert, gluten-free option, fruity bars