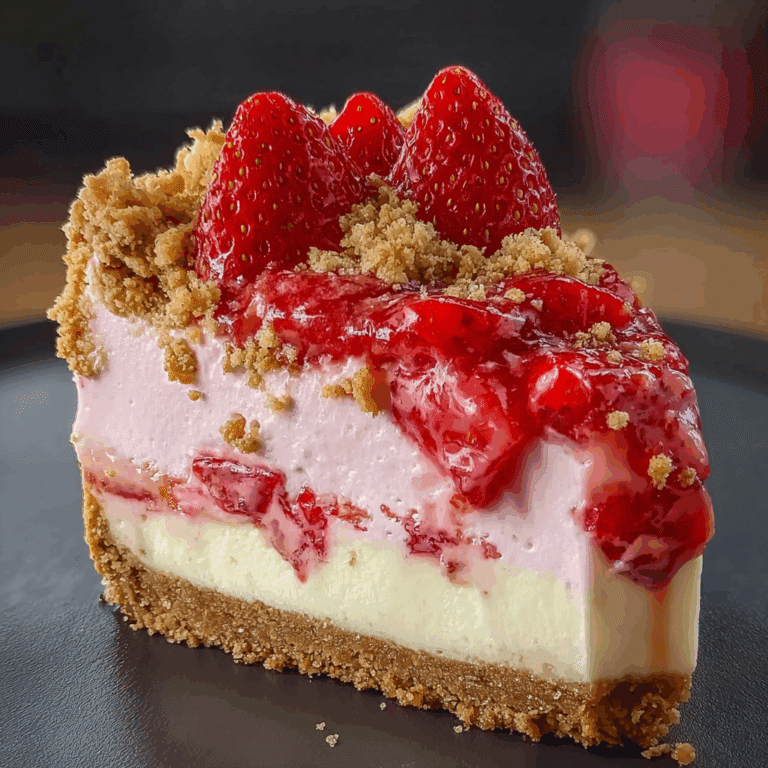
No-Bake Biscoff Cheesecake

If you’re craving a dessert that blends creamy, rich flavors with the unique hint of caramelized biscuits, then the No-Bake Biscoff Cheesecake is exactly what you need. This crowd-pleasing treat is as simple to prepare as it is indulgent, combining silky cream cheese with the irresistible crunch and spice of Biscoff cookies, all without ever heating up your kitchen. Whether you’re hosting a gathering, celebrating a special moment, or just treating yourself on an ordinary day, this no-bake delight guarantees satisfaction in every bite.
Why You’ll Love This Recipe
- Effortless preparation: No oven or complex baking skills needed, making it perfect for beginners and busy cooks alike.
- Deliciously creamy texture: Silky smooth cheesecake filling that melts in your mouth, balanced with crunchy Biscoff crust.
- Unique flavor profile: The caramelized, spiced notes of Biscoff cookies create an unforgettable twist on traditional cheesecake.
- Quick chilling time: Ready to enjoy after just a few hours in the fridge, ideal for last-minute dessert plans.
- Highly versatile: Easily customizable to dietary preferences or extra flavor additions.
Ingredients You’ll Need
This No-Bake Biscoff Cheesecake relies on simple ingredients that each bring an essential component to the table—from creamy richness to natural sweetness and crunchy texture—making each mouthful a perfect harmony.
- Biscoff cookies: Used both for the crust and as a feature ingredient in the filling, they provide signature caramel and spice notes.
- Unsalted butter: Melted and mixed with crushed cookies to form a sturdy, flavorful crust.
- Cream cheese: The base of the creamy filling, lending smoothness and body.
- Heavy cream: Whipped to create lightness and airy texture in the cheesecake layer.
- Powdered sugar: Adds subtle sweetness without graininess, ensuring a smooth finish.
- Biscoff spread: Intensifies the cookie flavor within the filling, creating that iconic Biscoff taste throughout.
- Vanilla extract: Enhances the overall flavor without overpowering the Biscoff notes.
Variations for No-Bake Biscoff Cheesecake
Feel free to get creative with this recipe—No-Bake Biscoff Cheesecake adapts beautifully to your taste or dietary needs, allowing you to make it your own with just a few tweaks.
- Vegan swap: Use vegan cream cheese and coconut cream to enjoy a dairy-free version with all the flavor.
- Chocolate twist: Add a layer of melted dark chocolate on top or swirl into the filling for added richness.
- Nutty upgrade: Sprinkle chopped toasted pecans or almonds for added crunch and warmth.
- Fruit topping: Fresh strawberries, raspberries, or a drizzle of berry compote balance the sweetness with bright freshness.
- Spiced variation: Include a pinch of cinnamon or nutmeg in the crust or filling to complement the Biscoff spices further.

How to Make No-Bake Biscoff Cheesecake
Step 1: Prepare the Crust
Start by crushing the Biscoff cookies into fine crumbs using a food processor or a rolling pin inside a sealed bag. Combine the cookie crumbs with melted unsalted butter until the mixture holds together when pressed. Press this evenly into the base of your chosen springform pan or individual serving cups.
Step 2: Make the Creamy Filling
In a mixing bowl, beat softened cream cheese until smooth and creamy. Add powdered sugar and vanilla extract, mixing until well combined. Fold in the Biscoff spread to infuse that characteristic caramel flavor throughout the filling.
Step 3: Whip the Heavy Cream
Whip the heavy cream until soft peaks form, creating a light and airy texture. Gently fold the whipped cream into the cream cheese mixture to keep the filling fluffy but stable.
Step 4: Assemble the Cheesecake
Pour the filling over the prepared cookie crust, smoothing the top with a spatula for an even finish. For best results, tap the pan lightly on the countertop to remove air bubbles.
Step 5: Chill the No-Bake Biscoff Cheesecake
Cover the cheesecake with plastic wrap and refrigerate for at least 4 hours, or overnight for a firmer texture and enhanced flavors.
Pro Tips for Making No-Bake Biscoff Cheesecake
- Use room temperature cream cheese: This ensures a lump-free, silky filling when mixing.
- Don’t over-whip the cream: Whip only until soft peaks form to maintain a light texture without curdling.
- Press crust firmly: A tightly packed crust prevents crumbling when slicing your cheesecake.
- Refrigerate adequately: Sufficient chilling time is key to set the cheesecake properly.
- Use a serrated knife: To slice cleanly without cracking or smudging the creamy layers.
How to Serve No-Bake Biscoff Cheesecake
Garnishes
Top your cheesecake with a dusting of crushed Biscoff cookies, a drizzle of Biscoff spread, or a sprinkle of chopped nuts to add texture and visual appeal.
Side Dishes
Serve alongside fresh berries, a cup of rich coffee, or a scoop of vanilla ice cream to elevate the dessert experience and complement the flavors.
Creative Ways to Present
Try layering the cheesecake in individual glasses for an elegant parfait style or decorate with edible flowers and gold leaf for special occasions.
Make Ahead and Storage
Storing Leftovers
Store leftover No-Bake Biscoff Cheesecake covered tightly in the refrigerator for up to 4 days to keep it fresh and delicious.
Freezing
This cheesecake freezes well—wrap tightly in plastic wrap and aluminum foil, then freeze for up to 1 month; thaw in the refrigerator overnight before serving.
Reheating
Since this is a chilled dessert, no reheating is needed; simply serve straight from the fridge for the best texture and taste.
FAQs
Can I use a different cookie for the crust?
Absolutely! While Biscoff cookies give the cheesecake its unique flavor, you can substitute graham crackers or digestive biscuits for a different but still delicious base.
Is it possible to make this cheesecake gluten-free?
Yes, by using gluten-free Biscoff-style cookies or gluten-free graham crackers and ensuring all other ingredients are gluten-free, you can enjoy a safe and tasty gluten-free version.
How long does the cheesecake need to chill?
Chilling for at least 4 hours is recommended, but overnight chilling yields a firmer texture and deeper flavor development.
Can I make this cheesecake vegan?
Yes, substitute vegan cream cheese and coconut cream or a plant-based whipping cream to create a vegan-friendly dessert with similar creamy consistency.
What’s the best way to serve this cheesecake?
Serve chilled with simple garnishes like crushed cookies or fresh fruit, alongside coffee or a light dessert wine for a perfect pairing.
Final Thoughts
There’s something truly special about the No-Bake Biscoff Cheesecake that makes it stand out—a wonderful blend of creamy texture and deeply satisfying flavors, all made with effortless ease. Whether you’re new to cheesecake or a seasoned dessert lover, this recipe invites you to indulge without stress or fuss. So go ahead and treat yourself and your loved ones to a slice of this luscious, no-bake delight—you won’t regret it!
Related Posts
PrintNo-Bake Biscoff Cheesecake

A luscious No-Bake Biscoff Cheesecake combining creamy cream cheese filling with a crunchy, caramel-spiced Biscoff cookie crust. Easy to prepare without baking, this dessert offers a silky texture and an unforgettable flavor twist perfect for gatherings, special occasions, or everyday indulgence.
- Prep Time: 20 minutes
- Cook Time: 0 minutes
- Total Time: 4 hours 20 minutes (includes chilling time)
- Yield: 8 servings 1x
- Category: Dessert
- Method: No-Bake
- Cuisine: American
- Diet: Gluten Free (if using gluten-free Biscoff cookies)
Ingredients
For the Crust
- 200g Biscoff cookies (crushed into fine crumbs)
- 80g unsalted butter (melted)
For the Filling
- 450g cream cheese (softened)
- 200ml heavy cream
- 100g powdered sugar
- 120g Biscoff spread
- 1 tsp vanilla extract
Instructions
- Prepare the Crust: Crush the Biscoff cookies into fine crumbs using a food processor or by placing them in a sealed bag and rolling with a rolling pin. Combine the cookie crumbs with melted unsalted butter until the mixture holds together when pressed. Press the mixture evenly into the base of a springform pan or individual serving cups.
- Make the Creamy Filling: Beat the softened cream cheese in a mixing bowl until smooth and creamy. Add powdered sugar and vanilla extract and mix well until combined. Fold in the Biscoff spread thoroughly to infuse the filling with its characteristic caramel flavor.
- Whip the Heavy Cream: Whip the heavy cream until soft peaks form, creating a light and airy texture. Gently fold the whipped cream into the cream cheese mixture to keep the filling fluffy yet stable.
- Assemble the Cheesecake: Pour the filling over the prepared cookie crust. Use a spatula to smooth the top evenly, and tap the pan lightly on the countertop to remove any air bubbles.
- Chill the Cheesecake: Cover the cheesecake with plastic wrap and refrigerate for at least 4 hours, or overnight for a firmer texture and enhanced flavor.
Notes
- Use room temperature cream cheese to ensure a lump-free and silky filling.
- Do not over-whip the cream; whip only until soft peaks form to maintain a light texture without curdling.
- Press the crust firmly to prevent crumbling while slicing.
- Allow sufficient chilling time to properly set the cheesecake.
- Use a serrated knife to slice cleanly without cracking or smudging the layers.
Nutrition
- Serving Size: 1 slice (1/8 of cheesecake)
- Calories: 420 kcal
- Sugar: 25 g
- Sodium: 180 mg
- Fat: 32 g
- Saturated Fat: 18 g
- Unsaturated Fat: 10 g
- Trans Fat: 0 g
- Carbohydrates: 28 g
- Fiber: 1 g
- Protein: 5 g
- Cholesterol: 80 mg
Keywords: No-bake cheesecake, Biscoff cheesecake, easy dessert, creamy cheesecake, caramel cookie dessert, gluten-free cheesecake