Mini Lemon Curd Tarts
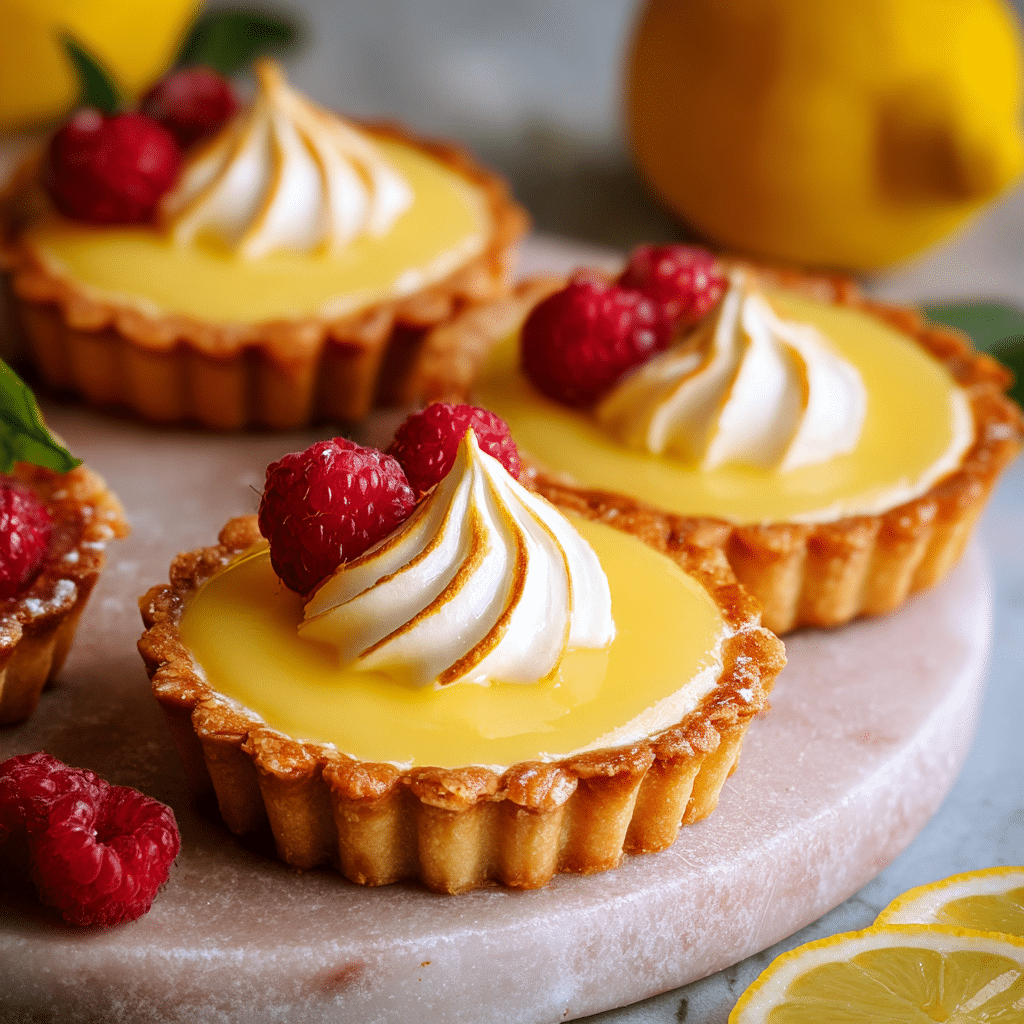
Discover the zesty delight of Mini Lemon Curd Tarts—perfectly sweet, tangy, and irresistibly bite-sized for any occasion. These charming little pastries combine a crisp, buttery crust with a luscious, velvety lemon curd filling that bursts with vibrant citrus flavor. Whether you’re hosting a festive gathering or simply craving a refreshing dessert, Mini Lemon Curd Tarts are sure to brighten your day with their sunny taste and elegant simplicity, making them a beloved treat for any dessert lover.
Why You’ll Love This Recipe
- Burst of Zesty Flavor: The bright lemon curd offers a perfect balance of tartness and sweetness that refreshes your palate.
- Bite-Sized Convenience: These tarts are easy to serve and enjoy, making them perfect for parties or casual snacking.
- Simple Yet Elegant: With basic ingredients and straightforward techniques, you’ll create a sophisticated dessert with minimal effort.
- Versatile for Any Occasion: Whether it’s a holiday, afternoon tea, or a casual dessert, Mini Lemon Curd Tarts fit seamlessly into any menu.
- Homemade Freshness: Nothing beats the vibrant taste of fresh lemon curd paired with a crisp tart shell made from scratch.
Ingredients You’ll Need
The magic behind flavorful Mini Lemon Curd Tarts lies in a few simple, fresh ingredients. Each plays a vital role in achieving the right balance between creamy, tangy, and crunchy textures that make these tarts irresistible.
- All-Purpose Flour: Provides the structure for the crisp tart shells that hold the luscious filling.
- Butter: Adds richness and buttery flakiness to the tart crust, essential for that melt-in-your-mouth texture.
- Sugar: Sweetens both the crust and the lemon curd, balancing the citrusy tartness.
- Fresh Lemons: Juiced and zested to deliver a punch of authentic, bright lemon flavor for the curd.
- Eggs: Help set the lemon curd while adding a silky smooth consistency.
- Heavy Cream (Optional): Enhances the curd’s creaminess, making it luxuriously smooth.
- Salt: A pinch to enhance all the flavors harmoniously.
Variations for Mini Lemon Curd Tarts
Mini Lemon Curd Tarts are wonderfully adaptable to fit your taste preferences or dietary needs. Feel free to experiment with these simple tweaks to make the recipe your own.
- Gluten-Free Crust: Substitute all-purpose flour with a gluten-free blend to make the tart shells safe for gluten-sensitive guests.
- Vegan Lemon Curd: Use coconut milk and cornstarch as vegan substitutes for heavy cream and eggs in the curd.
- Herbal Twist: Add fresh thyme or basil to the lemon curd for an unexpected herbal depth.
- Berry Topping: Garnish with fresh raspberries, blueberries, or a mixed berry compote to add a juicy sweetness.
- Spiced Variation: Sprinkle a touch of cinnamon or ginger into the crust for a warm spice note that complements the lemon.

How to Make Mini Lemon Curd Tarts
Step 1: Prepare the Tart Shells
Begin by combining chilled butter, flour, sugar, and a pinch of salt in a food processor or by hand until the mixture resembles coarse crumbs. Add cold water gradually and bring the dough together, then chill for at least 30 minutes before rolling out and pressing into mini tart pans.
Step 2: Bake the Shells
Preheat your oven to 350°F (175°C). Blind bake the tart shells by lining them with parchment paper and filling with pie weights or dried beans. Bake for about 15 minutes, then remove weights and bake for another 5 minutes until golden and crisp.
Step 3: Make the Lemon Curd
In a saucepan, whisk together fresh lemon juice, zest, sugar, eggs, and butter. Cook over medium-low heat, stirring constantly until thickened to a custard-like consistency. Remove from heat and strain to ensure smoothness, then cool.
Step 4: Assemble the Tarts
Once tart shells have fully cooled, spoon or pipe the lemon curd filling into each shell evenly. Chill in the refrigerator for at least an hour to set before serving.
Pro Tips for Making Mini Lemon Curd Tarts
- Use Room Temperature Ingredients: This helps the lemon curd mix smoothly without curdling.
- Chill the Dough Thoroughly: Cold dough prevents shrinking and ensures flaky tart shells.
- Strain the Lemon Curd: Removing lumps guarantees a silky smooth, professional finish.
- Don’t Overbake the Shells: Keeping them pale golden keeps shells tender rather than too crisp or dry.
- Adjust Sweetness: Taste the curd before baking and add more sugar if needed, balancing the tartness perfectly.
How to Serve Mini Lemon Curd Tarts
Garnishes
Enhance the visual appeal and flavor by topping your Mini Lemon Curd Tarts with a light dusting of powdered sugar, fresh mint leaves, or thin lemon slices. This simple touch adds freshness and a burst of color.
Side Dishes
Pair these tarts with a dollop of whipped cream or a scoop of vanilla ice cream for extra indulgence. They are also wonderful alongside a cup of hot tea or sparkling lemonade to complement the citrusy notes.
Creative Ways to Present
Serve Mini Lemon Curd Tarts on tiered dessert stands for a tea party vibe, or arrange them on a rustic wooden board decorated with edible flowers for a charming, homemade aesthetic. Individual clear cups or mini tart boxes make them perfect for take-home treats or gifting.
Make Ahead and Storage
Storing Leftovers
Keep leftover Mini Lemon Curd Tarts refrigerated in an airtight container for up to three days to preserve their freshness and texture.
Freezing
For longer storage, freeze unfilled tart shells separately wrapped tightly; once the lemon curd is made, fill and freeze the assembled tarts on a tray before transferring to a container. Thaw in the fridge overnight before serving.
Reheating
If you prefer a slightly warm tart, gently heat chilled tarts in a low-temperature oven for 5 minutes. Avoid microwaving to prevent curd texture changes.
FAQs
Can I make the lemon curd ahead of time?
Yes! Lemon curd can be prepared up to a week in advance and stored in the refrigerator, which actually enhances its flavor as it rests.
What if I don’t have mini tart pans?
You can use a mini muffin tin lined with paper liners, or a silicone mold to shape the tart shells, though the edges may be less defined.
Is it possible to use bottled lemon juice?
While fresh lemons are best for vibrant flavor, bottled lemon juice can work; just be sure to adjust sugar to balance any bitterness or acidity differences.
How do I prevent the tart shells from getting soggy?
Blind baking the shells fully and cooling them completely before adding the curd helps keep the crust crisp and prevents sogginess.
Can I double the recipe for a larger batch?
Absolutely! The recipe scales well; just bake the tart shells in batches and prepare more lemon curd accordingly.
Final Thoughts
Mini Lemon Curd Tarts bring a burst of sunshine to any dessert table with their perfect balance of tangy brightness and sweet richness. Easy to make and endlessly customizable, this recipe invites you to share a little slice of joy with friends and family. So go ahead, whip up these delightful treats and watch smiles light up as everyone discovers their new favorite bite-sized dessert.
Related Posts
- Cookie Butter Caramel Cheesecake Bars Recipe
- White Chocolate Candy Cane Cookies
- Perfectly Soft & Chewy Red Velvet Thumbprint Cookies
Mini Lemon Curd Tarts

Mini Lemon Curd Tarts are delightful bite-sized pastries featuring a crisp, buttery crust filled with a smooth, tangy lemon curd. Perfect for any occasion, these tarts balance sweetness and citrus zest effortlessly, making them an elegant yet simple refreshing dessert.
- Prep Time: 45 minutes
- Cook Time: 20 minutes
- Total Time: 1 hour 5 minutes plus chilling time
- Yield: 24 mini tarts 1x
- Category: Appetizers
- Method: Baking
- Cuisine: American
- Diet: Gluten Free
Ingredients
For the Tart Shells
- 1 1/4 cups all-purpose flour (or gluten-free flour blend for gluten-free option)
- 1/2 cup unsalted butter, chilled and cubed
- 1/4 cup granulated sugar
- Pinch of salt
- 2–3 tablespoons cold water
For the Lemon Curd
- 1/2 cup fresh lemon juice (about 2–3 lemons)
- 2 teaspoons lemon zest
- 3/4 cup granulated sugar
- 3 large eggs
- 4 tablespoons unsalted butter, cut into small pieces
- 2 tablespoons heavy cream (optional, for creamier curd)
- Pinch of salt
Instructions
- Prepare the Tart Shells: Combine chilled butter, flour, sugar, and salt in a food processor or mix by hand until mixture resembles coarse crumbs. Gradually add cold water and bring dough together. Chill dough for at least 30 minutes before rolling out and pressing into mini tart pans.
- Bake the Shells: Preheat oven to 350°F (175°C). Blind bake tart shells by lining with parchment paper and filling with pie weights or dried beans. Bake for 15 minutes, remove weights, then bake an additional 5 minutes until golden and crisp.
- Make the Lemon Curd: In a saucepan, whisk lemon juice, zest, sugar, eggs, and butter. Cook over medium-low heat, stirring constantly until thickened to custard-like consistency. Remove from heat, strain to smooth, then stir in heavy cream if using. Cool completely.
- Assemble the Tarts: Once tart shells are fully cooled, spoon or pipe lemon curd evenly into each shell. Refrigerate for at least 1 hour to set before serving.
Notes
- Use room temperature ingredients to help lemon curd mix smoothly without curdling.
- Chill the dough thoroughly to prevent shrinking and ensure flaky shells.
- Strain lemon curd to remove lumps for a silky smooth finish.
- Do not overbake shells; keep them pale golden for tender texture.
- Adjust sweetness of lemon curd by tasting before cooking and adding sugar as needed.
Nutrition
- Serving Size: 1 mini tart
- Calories: 120 kcal
- Sugar: 10 g
- Sodium: 45 mg
- Fat: 7 g
- Saturated Fat: 4 g
- Unsaturated Fat: 2 g
- Trans Fat: 0 g
- Carbohydrates: 13 g
- Fiber: 0.3 g
- Protein: 1.5 g
- Cholesterol: 40 mg
Keywords: mini lemon curd tarts, lemon tarts, bite-sized dessert, citrus tartlets, gluten-free dessert, lemon curd recipe