Red Velvet Cake Balls
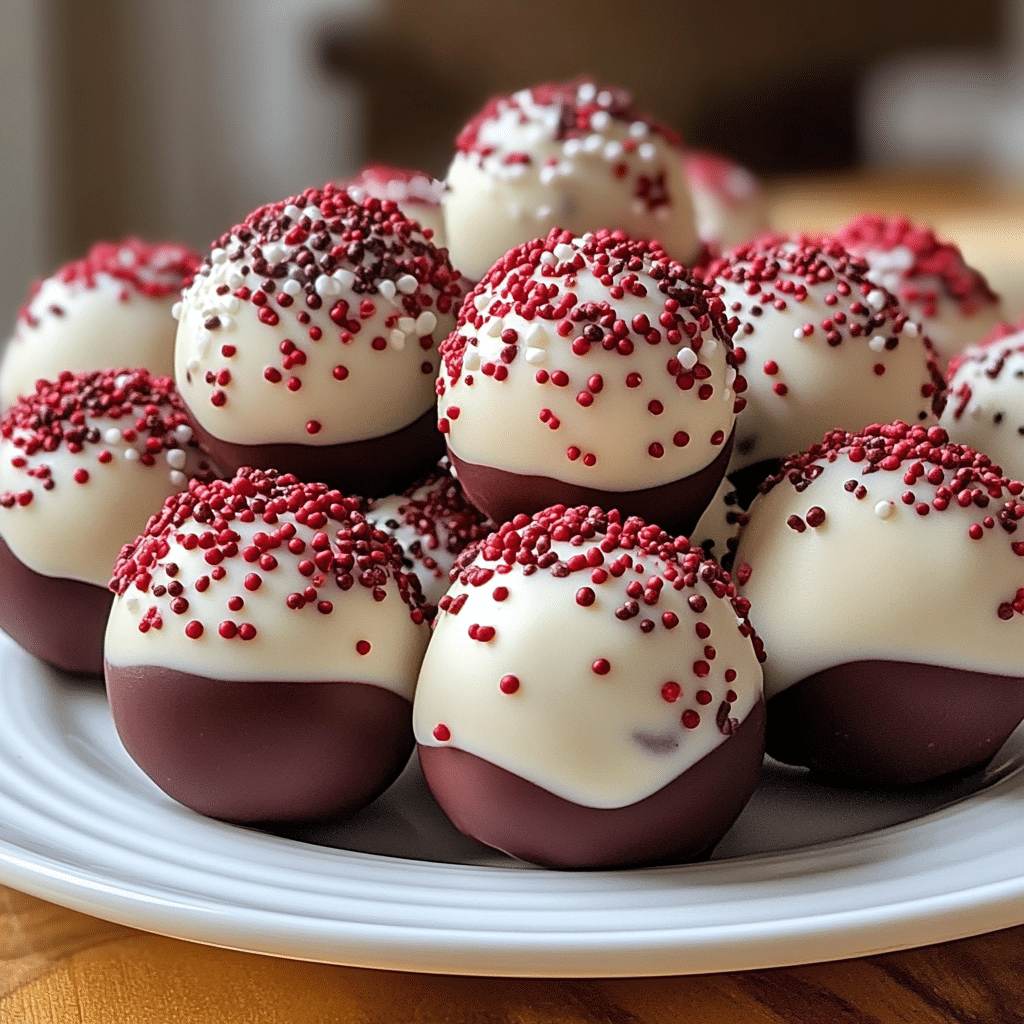
Red Velvet Cake Balls are the ultimate bite-sized indulgence that combine the vibrant, tender crumb of classic red velvet cake with a rich, creamy filling and a smooth chocolate or cream cheese coating. Whether you’re looking for a fun dessert for parties, a unique treat to share with friends, or simply want to satisfy your sweet tooth, this recipe will guide you to make irresistibly moist and flavorful Red Velvet Cake Balls that everyone will adore.
Why You’ll Love This Recipe
- Effortlessly Delicious: This recipe simplifies the process of creating decadent Red Velvet Cake Balls without sacrificing flavor or texture.
- Perfectly Moist: The combination of the cake and cream cheese mixture ensures every bite is rich and velvety without being dry.
- Customizable Treats: Easily adjust coatings and decorations to fit any occasion or personal taste.
- Kid-Friendly and Crowd-Pleasing: These bite-sized desserts are a hit with all ages and perfect for potlucks or celebrations.
- Easy to Make Ahead: Great for prepping in advance, saving stress on the day you want to serve them.
Ingredients You’ll Need
The magic of Red Velvet Cake Balls lies in simple, quality ingredients that work harmoniously for perfect taste, texture, and that iconic red hue.
- Red Velvet Cake Mix: A classic or homemade cake mix provides the moist, soft base with signature flavor and color.
- Cream Cheese Frosting: Adds a tangy sweetness that binds the cake crumbs into perfectly moist balls.
- White Chocolate or Candy Melts: These create a smooth, luscious coating that hardens crispy and beautiful.
- Red Food Coloring (Optional): Enhance the vibrant red color if your cake mix isn’t deep enough.
- Vanilla Extract: Adds depth and warmth to both the cake and frosting flavors.
- Sprinkles or Crushed Nuts: For fun, festive decoration and texture (optional).
Variations for Red Velvet Cake Balls
Want to get creative? Red Velvet Cake Balls lend themselves beautifully to customization whether for dietary needs, flavor twists, or occasions.
- Chocolate Dipped: Swap white chocolate coating with dark or milk chocolate for a classic contrast that’s irresistible.
- Vegan Version: Use dairy-free cream cheese frosting and plant-based cake mix alternatives to make them vegan-friendly.
- Nutty Crunch: Roll the finished balls in crushed pecans or almonds for extra texture and a nutty note.
- Spiced Red Velvet: Add cinnamon and nutmeg into the cake batter for a festive, warm twist.
- Mini Cheesecakes: Incorporate a mini cheesecake filling inside the balls for a creamy surprise with every bite.

How to Make Red Velvet Cake Balls
Step 1: Bake the Red Velvet Cake
Begin by baking your red velvet cake according to package instructions or your favorite recipe. Use a 9×13 inch pan for even thickness, and allow the cake to cool completely to prevent melting the frosting in the next step.
Step 2: Crumble the Cake
Once cooled, break the cake into small crumbs using your hands or a fork in a large mixing bowl. The finer the crumbs, the more uniform your cake balls will be.
Step 3: Mix with Cream Cheese Frosting
Add the cream cheese frosting to the cake crumbs—start with a few tablespoons and gradually add more until the mixture holds together when pressed, but isn’t overly sticky.
Step 4: Form the Balls
Using a small cookie scoop or your hands, roll the mixture into 1-inch balls and place them on a parchment-lined baking sheet. Chill the balls in the refrigerator for at least 30 minutes to firm up before coating.
Step 5: Coat the Cake Balls
Melt the white chocolate or candy melts gently. Dip each chilled ball carefully into the melted coating, ensuring it is fully covered. Place them back on parchment paper and add sprinkles or decorations if desired before the coating hardens.
Step 6: Chill and Serve
Allow the coated Red Velvet Cake Balls to set fully in the refrigerator for about 15-20 minutes. They are now ready to enjoy or store for later!
Pro Tips for Making Red Velvet Cake Balls
- Use Room Temperature Ingredients: Ensures even mixing and a smoother frosting incorporation.
- Don’t Overmix the Frosting: Too much frosting makes the balls gummy and hard to shape.
- Work Quickly When Coating: Candy melts set fast—dip one ball at a time for best results.
- Proper Drying Time: Give cake balls enough chill time to hold shape and prevent cracking when dipped.
- Choose the Right Dipping Tool: Toothpicks or forks help keep hands clean and make coating easier.
How to Serve Red Velvet Cake Balls
Garnishes
Add an extra touch by sprinkling crushed red velvet crumbs, edible glitter, or festive colored sprinkles over the freshly dipped balls to make them pop visually and in flavor.
Side Dishes
Serve these delightful bites alongside a cup of hot coffee, tea, or a glass of cold milk for a perfectly balanced indulgence that hits every note from rich to refreshing.
Creative Ways to Present
Place Red Velvet Cake Balls on decorative sticks for cake pops, arrange them artfully on a tiered tray, or package them in cute boxes for gifting—making these treats as beautiful as they are delicious.
Make Ahead and Storage
Storing Leftovers
Keep leftover Red Velvet Cake Balls in an airtight container in the refrigerator for up to 5 days to maintain freshness and flavor.
Freezing
Place cake balls in a single layer on a baking sheet and freeze until firm; then transfer to an airtight container or bag. They freeze well for up to 2 months, perfect for prepping ahead of time.
Reheating
Thaw frozen cake balls overnight in the refrigerator. Serve chilled or let them sit at room temperature for 15 minutes for the most pleasant texture and taste.
FAQs
Can I make Red Velvet Cake Balls without a cake mix?
Absolutely! You can bake your own red velvet cake from scratch to use as the base for the cake balls, giving you full control over ingredients and flavor.
What if I don’t have cream cheese frosting?
You can substitute with homemade cream cheese frosting or a buttercream frosting variation, but cream cheese adds the signature tang that balances the sweetness best.
How do I prevent the coating from cracking?
Ensure your cake balls are chilled well before dipping, and avoid dipping over-chilled balls too quickly; room temperature coating helps minimize cracks.
Can I use dark chocolate instead of white chocolate?
Yes, dark or milk chocolate works wonderfully for coating and adds a richer flavor that contrasts nicely with the red velvet taste.
Are Red Velvet Cake Balls gluten-free?
Traditional versions are not gluten-free due to the cake mix, but you can use gluten-free cake mixes to create delicious gluten-free Red Velvet Cake Balls.
Final Thoughts
Making Red Velvet Cake Balls is a fun, rewarding experience that results in a crowd-pleasing treat every time. With just a few simple ingredients and some love, you’ll have these rich, moist, and charming desserts ready to share with friends and family. Give this recipe a try and watch them disappear quickly—these little bites of joy are truly unforgettable!
Related Posts
PrintRed Velvet Cake Balls

Red Velvet Cake Balls are irresistible bite-sized treats combining moist, vibrant red velvet cake with creamy frosting and a smooth chocolate or cream cheese coating. Perfect for parties, potlucks, or a sweet snack, this recipe guides you step-by-step to make moist, flavorful, and customizable cake balls that everyone will enjoy.
- Prep Time: 20 minutes
- Cook Time: 30 minutes
- Total Time: 1 hour 10 minutes
- Yield: Approximately 30 cake balls 1x
- Category: Appetizers
- Method: Baking
- Cuisine: American
- Diet: Gluten Free (if gluten-free cake mix is used)
Ingredients
Cake Base
- 1 box Red Velvet Cake Mix (or homemade red velvet cake batter)
- Optional: Red Food Coloring, if extra vibrant color is desired
- 1 teaspoon Vanilla Extract
Frosting
- 1 cup Cream Cheese Frosting (store-bought or homemade)
- 1 teaspoon Vanilla Extract (optional, for extra flavor depth)
Coating and Decorations
- 8 oz White Chocolate or Candy Melts (alternative: dark or milk chocolate for variation)
- Sprinkles, crushed nuts, or red velvet cake crumbs (optional)
Instructions
- Bake the Red Velvet Cake: Prepare and bake your red velvet cake according to the package instructions or your favorite homemade recipe in a 9×13 inch pan. Allow the cake to cool completely before proceeding to avoid melting the frosting later.
- Crumble the Cake: Break the cooled cake into fine crumbs using your hands or a fork in a large mixing bowl. The finer the crumbs, the smoother and more uniform your cake balls will be.
- Mix with Cream Cheese Frosting: Gradually add cream cheese frosting to the cake crumbs, starting with a few tablespoons. Mix until the crumbs hold together firmly when pressed but aren’t overly sticky or gummy.
- Form the Balls: Using a small cookie scoop or your hands, roll the mixture into 1-inch balls. Place each ball on a parchment-lined baking sheet. Chill the balls in the refrigerator for at least 30 minutes to firm up before coating.
- Coat the Cake Balls: Gently melt the white chocolate or candy melts. Dip each chilled ball completely into the melted coating and place back on parchment paper. Quickly add sprinkles or other decorations before the coating sets.
- Chill and Serve: Allow the coated cake balls to set fully in the refrigerator for about 15-20 minutes. Serve chilled or store for later enjoyment.
Notes
- Use room temperature ingredients to ensure smooth mixing and better frosting incorporation.
- Do not overmix frosting into cake crumbs to avoid gummy texture.
- Work quickly when coating as candy melts set fast—dip one ball at a time.
- Chill cake balls sufficiently before dipping to prevent cracking of the coating.
- Use toothpicks or forks for dipping to keep hands clean and improve coating coverage.
Nutrition
- Serving Size: 1 cake ball
- Calories: 120
- Sugar: 14g
- Sodium: 90mg
- Fat: 6g
- Saturated Fat: 4g
- Unsaturated Fat: 1g
- Trans Fat: 0g
- Carbohydrates: 16g
- Fiber: 0.5g
- Protein: 1g
- Cholesterol: 15mg
Keywords: Red Velvet Cake Balls, bite-sized dessert, cream cheese frosting, chocolate coating, party treats, gluten-free dessert option, homemade red velvet