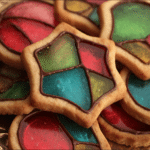
Stained Glass Cookies

If you’re looking for a delightful, eye-catching treat that brings a pop of color and fun to any occasion, then you’re in the right place! This guide on how to make perfect Stained Glass Cookies will walk you through creating these charming, colorful delights that look as beautiful as they taste. With simple ingredients and clear steps, you’ll soon have a batch of festive, jewel-like treats that everyone will rave about. Whether you’re baking for the holidays, a party, or just because, Stained Glass Cookies are sure to sparkle on your dessert table.
Why You’ll Love This Recipe
- Vibrant and Fun: Each cookie features a colorful “stained glass” center that shines through, creating a playful and attractive look that’s impossible to resist.
- Simple Ingredients: You only need a handful of pantry staples and candies, making this recipe approachable and budget-friendly.
- Perfect for Any Occasion: Customize colors to suit holidays or themes, making these cookies great for birthdays, Christmas, Easter, or any celebration.
- Kid-Approved: Making Stained Glass Cookies is a fun activity the whole family can enjoy, combining creativity with delicious snacking.
- Delicious Texture: The combination of crisp cookie edges and chewy, glassy centers provide an irresistible bite experience.
Ingredients You’ll Need
These simple ingredients come together perfectly to create the classic, colorful look and wonderful taste of Stained Glass Cookies. Each component plays a key role in the texture, flavor, and vibrant appearance of the final product.
- All-Purpose Flour: The base of the cookie dough, providing structure and a tender crumb.
- Sugar: Adds sweetness and helps the dough get that slight crispness on the edges.
- Butter: For richness and a melt-in-your-mouth texture—make sure it’s softened for easy mixing.
- Egg: Acts as a binder to hold the dough together smoothly.
- Vanilla Extract: Gives the cookie dough lovely, warm flavor notes that complement the sweet candy centers.
- Baking Powder: Helps the cookies rise slightly, keeping them light.
- Assorted Hard Candies: Crushed to create the vibrant stained glass effect in the cookie centers.
- Salt: A pinch enhances all the flavors and balances the sweetness.
Variations for Stained Glass Cookies
Feel free to personalize your Stained Glass Cookies to match your mood, dietary needs, or holiday themes. This recipe is super adaptable, which means you can get creative easily!
- Gluten-Free Version: Swap all-purpose flour for a gluten-free blend for a safe treat everyone can enjoy.
- Flavor Twists: Add a dash of almond or peppermint extract in place of vanilla for a festive flavor change.
- Color Themes: Choose different colored hard candies to make cookies perfect for birthdays, Christmas, or other occasions.
- Size Variety: Make mini stained glass cookies for bite-sized treats or larger cookies as edible gifts.
- Sugar-Free Options: Use sugar-free hard candies and an appropriate sugar substitute in the dough.

How to Make Stained Glass Cookies
Step 1: Prepare the Dough
Start by creaming softened butter and sugar together in a large bowl until fluffy. Beat in the egg and vanilla extract until fully combined. In a separate bowl, whisk together flour, baking powder, and salt. Gradually add the dry ingredients to the wet mixture, stirring until a smooth dough forms. Wrap it in plastic wrap and chill for at least an hour to make rolling easier and prevent spreading during baking.
Step 2: Crush the Hard Candies
While the dough chills, unwrap your chosen hard candies and place them in a resealable bag. Use a rolling pin or a meat mallet to crush the candies into small pieces—not too fine, as some chunkiness helps achieve the stained glass look. Set the candy pieces aside.
Step 3: Roll and Cut the Cookies
Preheat your oven to 350°F (175°C). On a lightly floured surface, roll out the dough to about 1/4 inch thickness. Use a large cookie cutter to cut out cookie shapes. Then, with a smaller cutter or a sharp knife, cut out a shape inside each cookie to create a frame, leaving the edges intact to hold the candy.
Step 4: Fill with Crushed Candy
Place the cookies on a parchment-lined baking sheet. Fill each centered cutout with the crushed candy pieces, spreading them evenly. Avoid overfilling to allow the candy to melt and settle nicely.
Step 5: Bake to Perfection
Bake the cookies for 10-12 minutes or until the edges are lightly golden and the candy centers have melted into glossy, translucent patches. Let the cookies cool completely on the baking sheet before moving them, so the candy hardens perfectly.
Pro Tips for Making Stained Glass Cookies
- Use the Right Candy: Choose clear or brightly colored hard candies like Jolly Ranchers or Life Savers for the best stained glass effect.
- Mind the Thickness: Rolling the dough too thin can cause breakage, so aim for about 1/4 inch to keep sturdy edges.
- Chilling is Key: Don’t skip chilling the dough; it helps the cookies hold their shape while baking.
- Don’t Overfill: Use just enough crushed candy to fill the cutouts without overflowing to avoid sticky messes.
- Allow Full Cooling: Be patient and let the cookies cool fully before removing them to keep the stained glass centers intact.
How to Serve Stained Glass Cookies
Garnishes
For an extra touch of charm, dust your cookies lightly with powdered sugar once cooled or drizzle with a thin glaze that complements your candy flavors. Edible glitter or colored sugar sprinkles also add sparkle without overpowering the stained glass effect.
Side Dishes
Pair these colorful cookies with warm beverages like spiced tea, freshly brewed coffee, or hot cocoa for a cozy experience. They also serve beautifully alongside simple vanilla ice cream or fruit compotes to balance sweetness.
Creative Ways to Present
Arrange the cookies on a glass platter or tiered dessert stand so light shines through the “stained glass” centers, enhancing their jewel-like appearance. You can also tie a small stack with colorful ribbon as gift-worthy favors or package them in clear boxes for stunning edible gifts.
Make Ahead and Storage
Storing Leftovers
Store your Stained Glass Cookies in an airtight container at room temperature. They stay fresh and crunchy for up to one week. To avoid the candy centers sticking to each other, place wax paper between layers.
Freezing
You can freeze unbaked cookie dough wrapped tightly in plastic wrap for up to 3 months. When ready, thaw in the refrigerator overnight and proceed as usual. Finished baked cookies freeze well too—just layer them carefully in airtight containers to prevent damage.
Reheating
If you prefer your cookies slightly warm, reheat them gently in a preheated oven at 300°F (150°C) for 5 minutes. Avoid microwaving, which can soften and ruin the stained glass centers.
FAQs
What type of candy works best for Stained Glass Cookies?
Hard, colored candies like Jolly Ranchers, Life Savers, or generic fruit-flavored hard candy melts work best because they melt evenly while maintaining vibrant colors.
Can I use cookie cutters with intricate designs?
Yes, but simpler shapes tend to work best to keep the candy stable. Intricate cutouts may be fragile and harder to fill with candy pieces without breaking.
How do I prevent the candy centers from sticking to the baking sheet?
Always bake on parchment paper or a silicone baking mat to prevent sticking and make cleanup easier.
Can I make these cookies without eggs?
Yes! You can substitute the egg with flaxseed or chia seed gel in the dough, although the texture might be slightly different.
Why did my candy centers crack after baking?
This usually happens if the cookies cool too quickly or are handled before fully set. Allow cookies to cool completely on the baking sheet before moving them to avoid cracking.
Final Thoughts
There’s nothing quite like those twinkling, colorful Stained Glass Cookies to brighten up a gathering or make a baking day feel special. With this straightforward recipe, you’ll enjoy both the creative and tasty side of baking, producing festive treats that look almost too pretty to eat. Give this recipe a try and watch how they bring smiles and sparkle wherever they go!
Related Posts
PrintStained Glass Cookies
Create vibrant and fun Stained Glass Cookies featuring colorful melted candy centers that shine like jewel-like treats. This easy recipe uses simple pantry ingredients and crushed hard candies to produce festive cookies perfect for holidays, parties, or any celebration. Enjoy the delightful contrast of crisp cookie edges and glossy, chewy candy centers with customizable flavors and colors.
- Prep Time: 20 minutes
- Cook Time: 10-12 minutes
- Total Time: 1 hour 32 minutes
- Yield: 24 cookies 1x
- Category: Appetizers
- Method: Baking
- Diet: Gluten Free
Ingredients
Cookie Dough
- 2 1/2 cups all-purpose flour (or gluten-free blend for GF version)
- 3/4 cup granulated sugar
- 1 cup (2 sticks) unsalted butter, softened
- 1 large egg
- 1 teaspoon vanilla extract
- 1 teaspoon baking powder
- 1/4 teaspoon salt
Stained Glass Centers
- Assorted hard candies (e.g., Jolly Ranchers or Life Savers), unwrapped and crushed
Instructions
- Prepare the Dough: Cream the softened butter and sugar together in a large bowl until light and fluffy. Beat in the egg and vanilla extract until fully combined. In a separate bowl, whisk together the flour, baking powder, and salt. Gradually add the dry ingredients to the wet mixture, mixing until a smooth dough forms. Wrap the dough in plastic wrap and chill for at least 1 hour to make rolling easier and prevent spreading during baking.
- Crush the Hard Candies: While the dough chills, unwrap your chosen hard candies and place them inside a resealable plastic bag. Use a rolling pin or meat mallet to crush the candies into small pieces—not too fine, to retain the stained glass effect. Set aside the crushed candy pieces.
- Roll and Cut the Cookies: Preheat your oven to 350°F (175°C). Lightly flour a work surface and roll out the chilled dough to about 1/4 inch thickness. Use a large cookie cutter to cut out your cookie shapes. Then, use a smaller cookie cutter or sharp knife to cut out a shape inside each cookie, leaving a frame to hold the candy.
- Fill with Crushed Candy: Line a baking sheet with parchment paper. Place the cookie frames on the sheet and fill each center cutout evenly with crushed candy. Avoid overfilling to allow the candy to melt and settle smoothly during baking.
- Bake to Perfection: Bake the cookies for 10-12 minutes or until the edges turn lightly golden and the candy centers melt into glossy, translucent patches. Let cool completely on the baking sheet so the candy hardens properly before removing.
Notes
- Use clear or brightly colored hard candies like Jolly Ranchers or Life Savers for the best stained glass effect.
- Roll dough to approximately 1/4 inch thickness to keep sturdy edges and prevent breakage.
- Chill dough before rolling to help cookies keep their shape while baking.
- Do not overfill the cutouts with candy to avoid overflow and sticky messes.
- Allow cookies to cool fully on the baking sheet to prevent candy centers from cracking.
- Substitute the egg with flaxseed or chia seed gel for an egg-free version.
- Store cookies in an airtight container at room temperature with wax paper between layers to keep them fresh up to one week.
- Freeze unbaked dough wrapped tightly for up to 3 months; thaw overnight before use. Baked cookies freeze well too.
- Reheat gently in an oven at 300°F (150°C) for 5 minutes; avoid microwaving.
Nutrition
- Serving Size: 1 cookie
- Calories: 150
- Sugar: 12g
- Sodium: 60mg
- Fat: 7g
- Saturated Fat: 4g
- Unsaturated Fat: 2g
- Trans Fat: 0g
- Carbohydrates: 20g
- Fiber: 0.5g
- Protein: 2g
- Cholesterol: 25mg
Keywords: Stained Glass Cookies, Holiday Cookies, Festive Cookies, Colored Candy Cookies, Gluten-Free Cookies, Kid-Friendly Baking, Easy Cookie Recipe