Easy Panini Bread Recipes to Try Today
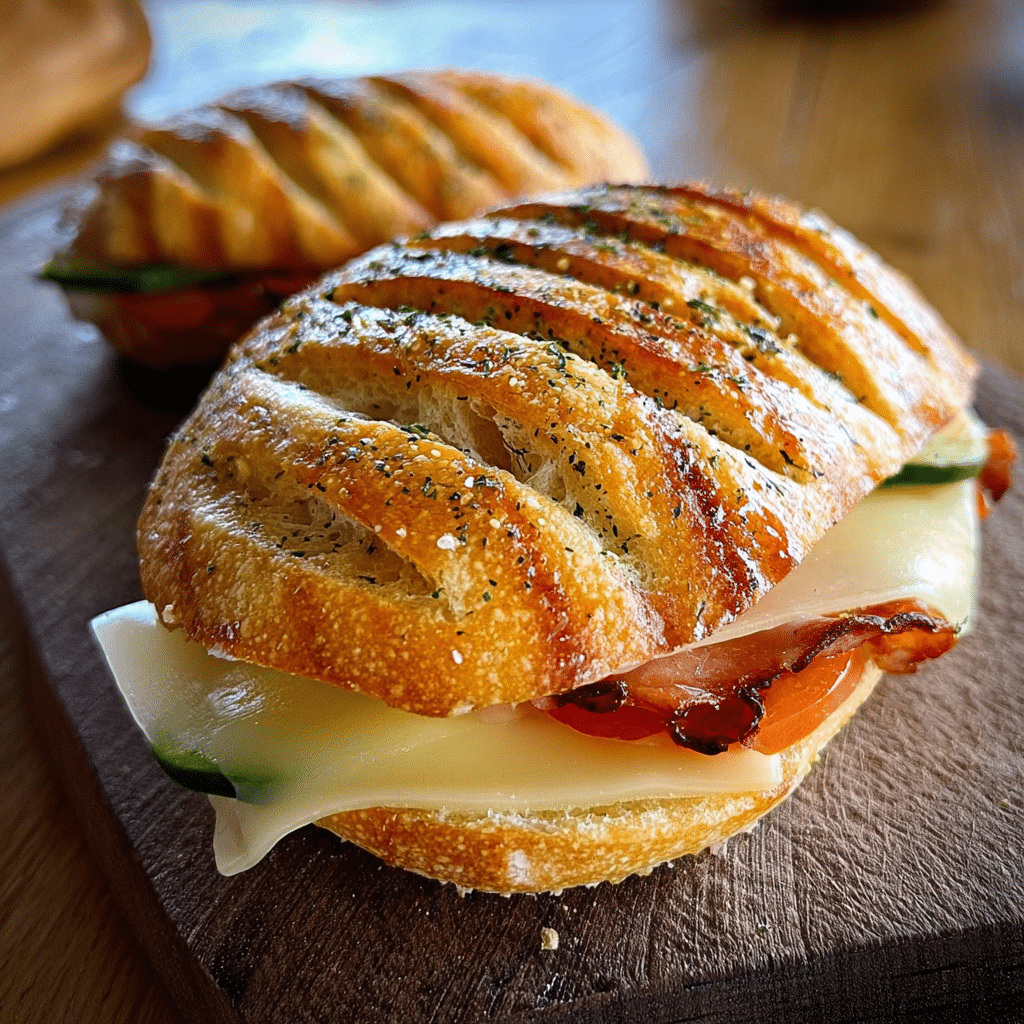
Panini Bread is a delightful homemade staple that elevates any sandwich experience. Whether you’re craving a savory panini stacked with your favorite fillings or a simple, lightly toasted treat, crafting your own Panini Bread at home is surprisingly easy and rewarding. This bread’s perfect balance of a soft interior and a crisp exterior makes it ideal for quick meals and tasty snacks any time of day.
Why You’ll Love This Recipe
- Simple Ingredients: Uses basic pantry staples that are easy to find and affordable.
- Perfect Texture: Yields bread with a soft crumb and a slightly crunchy crust, ideal for pressing in a panini maker.
- Versatility: Works wonderfully for sandwiches, wraps, or just enjoying plain with butter.
- Quick Prep: Requires minimal hands-on time, making it convenient for busy days.
- Customizable: Easy to tweak the recipe to include your favorite herbs or seeds for added flavor.
Ingredients You’ll Need
The beauty of this Panini Bread recipe lies in its simplicity. Each ingredient plays a crucial role in developing the bread’s texture, flavor, and color, resulting in a loaf that’s tender yet resilient enough to hold hearty fillings.
- All-Purpose Flour: Provides the structure and chewiness essential for traditional Panini Bread.
- Warm Water: Activates the yeast and ensures a light, airy crumb.
- Active Dry Yeast: Helps the dough rise, giving the bread its perfect fluffiness.
- Olive Oil: Adds moisture and a subtle richness to the bread’s texture.
- Salt: Balances the flavors and strengthens the gluten network.
- Sugar: Feeds the yeast and enhances browning during baking.
Variations for Panini Bread
Don’t hesitate to make this Panini Bread your own! It’s incredibly easy to adapt based on what you have in your pantry or dietary preferences, enabling you to experiment with flavors and textures that suit your taste perfectly.
- Whole Wheat Twist: Substitute half of the all-purpose flour with whole wheat flour for a nuttier flavor and extra fiber.
- Herb Infusion: Mix in dried rosemary, basil, or oregano to add an aromatic touch that pairs well with savory fillings.
- Gluten-Free Version: Use a gluten-free all-purpose blend and xanthan gum for a similar texture without gluten.
- Seed Toppings: Sprinkle sesame seeds, poppy seeds, or sunflower seeds on top before baking for added crunch.
- Cheese Burst: Fold shredded mozzarella or parmesan into the dough for a cheesy surprise in every bite.

How to Make Panini Bread
Step 1: Activate the Yeast
Start by dissolving the active dry yeast and sugar in warm water, roughly between 105°F and 115°F, then let it sit for about 5 to 10 minutes until frothy and bubbling, signaling the yeast is alive and ready.
Step 2: Mix the Dough
In a large bowl, combine the flour and salt. Gradually add the yeast mixture and olive oil, stirring with a wooden spoon or your hands until a shaggy dough begins to form.
Step 3: Knead Until Smooth
Transfer the dough onto a lightly floured surface and knead vigorously for about 8 to 10 minutes until it becomes smooth and elastic, which ensures good gluten development for that signature Panini Bread texture.
Step 4: First Rise
Place the dough in a greased bowl, cover it with a damp cloth or plastic wrap, and let it rise in a warm spot for 1 to 2 hours, or until it has doubled in size, which creates that light and airy crumb.
Step 5: Shape and Second Rise
Gently punch down the dough and form it into a loaf or several smaller sandwich-sized shapes. Place on a parchment-lined baking sheet, cover again, and let rise for another 30 to 45 minutes.
Step 6: Bake to Perfection
Preheat your oven to 425°F (220°C). Optionally, brush the top with olive oil or water and sprinkle seeds if desired. Bake for about 20 to 25 minutes, or until the crust is golden and the loaf sounds hollow when tapped.
Step 7: Cool Completely
Let the bread cool on a wire rack before slicing. Cooling ensures the crumb finishes setting, which is key to perfect slices for your paninis.
Pro Tips for Making Panini Bread
- Precise Water Temperature: Use warm, not hot water to avoid killing the yeast.
- Knead Well: Proper kneading is essential for gluten structure and the chewy texture you want.
- Don’t Rush Rising: Let the dough rise fully to develop flavor and lightness.
- Score the Loaf: Lightly slash the top before baking to control how the bread expands and adds a rustic look.
- Use a Baking Stone or Steel: If possible, bake on a preheated stone for an even crispier crust.
How to Serve Panini Bread
Garnishes
Add fresh basil leaves, a drizzle of balsamic glaze, or a sprinkle of sea salt after toasting your Panini Bread sandwiches for an elevated flavor finish that makes every bite special.
Side Dishes
Complement your Panini Bread sandwiches with crisp salads, a warm bowl of soup, or roasted vegetables for a balanced and satisfying meal.
Creative Ways to Present
Cut slices diagonally for elegant triangles, serve alongside dipping oils flavored with herbs and garlic, or stack mini panini bites on skewers for party-friendly snacks everyone will love.
Make Ahead and Storage
Storing Leftovers
Wrap your Panini Bread tightly in plastic wrap or keep it in an airtight container at room temperature for up to 2 days to maintain freshness.
Freezing
Freeze whole loaves or sliced portions in freezer bags for up to 3 months; just thaw at room temperature when ready to use.
Reheating
Warm leftover bread in a toaster oven or skillet for a few minutes to bring back the crisp crust and soft interior, making it taste freshly baked again.
FAQs
What makes Panini Bread different from regular sandwich bread?
Panini Bread typically has a denser crumb and a crispier crust to withstand grilling or pressing, which makes it perfect for toasted sandwiches without becoming soggy.
Can I use bread flour instead of all-purpose flour?
Yes, bread flour can be used and will result in a chewier texture thanks to its higher protein content, which some people prefer in Panini Bread.
Is it necessary to use olive oil in the recipe?
While olive oil adds moisture and flavor, you can substitute with any mild vegetable oil or even melted butter depending on personal preference.
How long does the dough need to rise?
The dough should rise until doubled in size, typically 1 to 2 hours, depending on the room temperature and yeast activity.
Can I make Panini Bread without a stand mixer?
Absolutely! Kneading by hand works just fine and allows you to feel when the dough reaches the perfect elasticity.
Final Thoughts
Trying this Panini Bread recipe will quickly become one of your favorite kitchen adventures. It’s simple, flexible, and produces amazing results that turn everyday sandwiches into delicious, crave-worthy meals. Give it a go and enjoy the warm satisfaction of homemade bread fresh from your oven!
Related Posts
- Why Chicken Bacon Ranch Stuffed Bread Is a Must-Try
- How to Make French Dip Biscuits Fast
- Why Crispy Fish Sandwich Is Your Next Favorite Bite
Panini Bread
This homemade Panini Bread recipe offers a perfect balance of a soft interior and a crisp exterior, making it ideal for sandwiches, paninis, and snacks. Using simple pantry ingredients, it’s easy to prepare with minimal hands-on time and customizable for added flavors or dietary preferences.
- Prep Time: 15 minutes
- Cook Time: 25 minutes
- Total Time: 2 hours 40 minutes
- Yield: 1 medium loaf or 4-6 sandwich-sized breads 1x
- Category: Appetizers
- Method: Baking
- Cuisine: Italian
- Diet: Contains Gluten
Ingredients
Main Ingredients
- 3 1/2 cups all-purpose flour (or substitute half with whole wheat flour for a whole wheat twist)
- 1 1/4 cups warm water (between 105°F and 115°F)
- 2 1/4 teaspoons active dry yeast (1 packet)
- 2 tablespoons olive oil (or mild vegetable oil or melted butter)
- 1 1/2 teaspoons salt
- 1 teaspoon sugar
Instructions
- Activate the Yeast: Dissolve the active dry yeast and sugar in the warm water (105°F to 115°F). Let it sit for 5 to 10 minutes until frothy and bubbling, indicating the yeast is active.
- Mix the Dough: In a large bowl, combine the flour and salt. Gradually add the yeast mixture and olive oil, stirring with a wooden spoon or your hands until a shaggy dough forms.
- Knead Until Smooth: Transfer the dough to a lightly floured surface and knead vigorously for 8 to 10 minutes until smooth and elastic, developing the gluten structure.
- First Rise: Place the dough in a greased bowl, cover with a damp cloth or plastic wrap, and let it rise in a warm spot for 1 to 2 hours until doubled in size.
- Shape and Second Rise: Punch down the dough gently and shape it into a loaf or smaller sandwich-sized portions. Place on a parchment-lined baking sheet, cover, and let rise for 30 to 45 minutes.
- Bake to Perfection: Preheat oven to 425°F (220°C). Optionally brush the top with olive oil or water and sprinkle seeds if desired. Bake for 20 to 25 minutes until the crust is golden and the loaf sounds hollow when tapped.
- Cool Completely: Let the bread cool on a wire rack before slicing to allow the crumb to set properly for perfect slices.
Notes
- Use warm, not hot water to avoid killing the yeast.
- Proper kneading is essential to develop gluten for the signature chewy Panini Bread texture.
- Allow dough to rise fully to enhance flavor and lightness.
- Lightly score the top of the loaf before baking to control expansion and add a rustic look.
- Bake on a preheated baking stone or steel if possible for a crisper crust.
Nutrition
- Serving Size: 1 slice (about 60g)
- Calories: 150
- Sugar: 1g
- Sodium: 250mg
- Fat: 3.5g
- Saturated Fat: 0.5g
- Unsaturated Fat: 3g
- Trans Fat: 0g
- Carbohydrates: 26g
- Fiber: 1g
- Protein: 5g
- Cholesterol: 0mg
Keywords: Panini Bread, homemade bread, sandwich bread, Italian bread, easy bread recipe